![]()
Coppermine Photo Gallery v1.3.5: Documentation and Manual
About Coppermine
Coppermine Photo Gallery is a picture gallery script. Users can upload pictures with a web browser (thumbnails are created on the fly), rate pictures, add comments and send e-cards. The admins can manage the galleries and batch add pictures that have been uploaded on the server by FTP. Support for multimedia files has been added recently.
Images are stored in albums and albums can be grouped by categories. The script supports multiple users and each user can possibly have its own set of albums.
The script also supports multiple languages and has a theme system. It uses PHP, a MySQL database and the GD library (version 1.x or 2.x) or ImageMagick to make the thumbnails. An install script makes the installation fast and simple.
Table of contents
- 4.10.1 General settings
- 4.10.2 Language, Themes & Charset settings
- 4.10.3 Album list view
- 4.10.4 Thumbnail view
- 4.10.5 Image view & Comment settings
- 4.10.6 File and thumbnail settings
- 4.10.7 Files and thumbnails advanced settings
- 4.10.8 User settings
- 4.10.9 Custom fields for image description
- 4.10.10 Cookie settings
- 4.10.11 Miscellaneous settings
- 5. Integrating the script with your bulletin board
1. What is required
- A web server that supports PHP (the script should work with any version >= 4.1.0) Note: If you use PHP 5+, register_long_arrays must be on.
- A MySQL database
- PHP compiled with the support for the GD library or the ImageMagick "convert" utility in order to make thumbnails and reduced size images
2. Installation and Setup
2.1 How to install the script
- Unpack the archive preserving the directory structure
(you can rename the coppermine folder, but not the files or folders within). - Upload all files onto your webserver (make sure to use the correct ftp mode)
- CHMOD the folders albums and include to 755 (or 777, depending on your server config) - this step is really important, don't skip it!
There are a lot of tutorials for beginners how to use chmod available: search chmod tutorials with google. If you're on a windows server, you'll have to set permissions accordingly as well (usually the webserver runs under the user name "IUSR_hostname" - you'll have to set rwx-permissions for this user). - Run the install script on your server (http://your_server/coppermine_dir/install.php) and follow the instructions
2.2 Getting started
Log in with the admin username and password you set up during install, click on the "admin mode" link if it is visible, go to the Config page and start to configure your gallery. Note that even if you are a member of the administrator group, you need to be in "admin mode" to configure your gallery.
There are some settings in config that can't be changed later (if there are already files in the database) - make sure to set them up correctly in the first place. Although you'll surely want to start using coppermine immediately it is advisable to configure those settings (marked with an asterisk "*") properly at the very beginning.
Use the "Album Manager" ("Albums" link in the admin menu) in to create and order your albums. You'll need at least one album your files can go into.
Use the anonymous group to define what non-regsitered users can and can't do (in the groups panel).
Use the properties of an album to modify its description and permissions.
In order for a user to be allowed to upload a file in album two conditions must be met:
- The user must be part of a group that can upload files.
- There must be at least one album where "Visitors can upload files"
has been set to "Yes",
OR
The user has created an album in the 'user galleries', if allowed.
The same applies to picture rating and comment posting.
If you have installed the script succesfully but are having trouble getting it working properly you can enable the "debug mode" on the config page. In this mode, the script outputs most of the warning/error messages produced by PHP in addition to some debug information. This can provide valuable information to understand what is wrong.
2.3 Using Windows XP Web Publishing Wizard with Coppermine
If you are using Windows XP, you can use its built-in web publishing wizard to upload your photos to your gallery.
Once you have properly installed the script on your server, call the xp_publish.php file from your web browser (http://your_site.com/coppermine_dir/xp_publish.php).
The script displays some information on how to do the installation on the client side and how to use the Wizard. Basically you will need to download a small file created by the script that needs to be loaded into your Windows registry.
2.3.1 XP Web Publishing Wizard: Setup
Before you can use the XP Web Publishing Wizard, it needs to know the address of the your gallery.- Open your browser and type the following into the address box replacing "your_site.com" and "coppermine_dir" with your own Gallery address information : http://your_site.com/coppermine_dir/xp_publish.php
- On "File Download - Security Warning" click "Save" to save the cpg_###.reg file on your Desktop. (The ### represents a 10-digit numerical timestamp.)
- Open Windows Explorer
- Select Desktop from the left panel
- Double click on the file name that you just saved
- On Registry Editor's "Are you sure..." dialog click "Yes"
2.3.2 XP Web Publishing Wizard: Uploading pictures
The process of uploading pictures is a matter of following a simple dialog. It takes much longer to describe the process than do it.- Start Windows Explorer and locate the directory with your photographs and select one or more pictures for upload.
- If the Windows Explorer left panel is not titled "Picture Tasks", click on the "X" in the top right corner of the panel to close it and to reveal the Picture Tasks panel.
- Select "Publish xxxx to the Web" from "File and Folder Tasks" on the left panel. "xxxx" could say "this file, these files or this folder" depending on what is highlighted on the right panel.
- On Web Publishing Wizard's Welcome screen click "Next".
- You can change your selection if necessary on the Thumbnail window showing up. Click "Next" when you are ready.
- From the service provider window highlight your Photo Gallery name and click "Next".
- Enter your Coppermine username and password to login to your gallery and click "Next".
- From the "Welcome username" window you have an option of uploading your picture(s) into one of the existing albums or starting a new album. Click "Next" when you are ready.
- Click "Next" in the upload starting confirmation window.
- Select the picture sizes for the uploaded pictures. If you are unsure about acceptable picture sizes, verify with your Gallery administrator. Click "Next" when you are ready.
- You are presented with the last window of the dialog and given a choice of opening the Gallery when the upload is complete.
- Click "Finish" to end the XP Web Publishing Wizard and to enter the Gallery to check the new album contents.
2.4 Creating or upgrading your own themes
To upgrade an existing custom theme, to version 1.3.x, read theme.htm
Coppermine themes are stored in the "themes" directory, they consist of 3 files :
- "template.html" the main template in plain HTML.
- "style.css" the stylesheet associated with the template
- "theme.php" the PHP theme file
To create a new template, the best solution is to use an existing one as a basis. To do that, make a copy of the folder of the theme you want to use as a basis. Then edit the "template.html" and "theme.php" files and replace all occurences of "themes/old_theme_dir" with "themes/new_theme_dir" in order for the links to point to the correct place.
When editing the "template.html" file do not remove the elements between {} these are the placeholders used by the script. Also keep in mind that despite this file being located in the "themes/your_theme_dir" directory, it must be build like if it was in the main directory of the script. Practically to load an image, you must use <img src="themes/theme_dir/images/image.gif" alt=""/> and not <img src="images/image.gif" alt=""/>. The same apply for the "theme.php" file.
Also, make sure not to delete the line <script type="text/javascript" src="scripts.js"></script> that is needed for the full-size pop-ups and other stuff related to JavaScript.
If you are using an HTML editor to make your template, the best solution is that you copy the "template.html" file into the main directory of the script and edit it there. If the script find a file named "template.html" in the main directory it will load it instead of the one of the theme directory. Once you have finished your editings, move the file back to the directory of your theme.
To modify the colors, fonts, font sizes, etc... used by the script, edit the "style.css" stylesheet. If you want to increase or decrease the size of the fonts you can simply modify the line with : table { font-size: 12px; }. Most of the font sizes used by the script are defined as a percentage of this size.
The "theme.php" file contains all the HTML templates used by the script. You can also edit them. When making modifications to these templates, don't touch the lines with <!-- BEGIN xxx --> and <!-- END xxx -->.
If you're not sure how to create your own theme, you could also have a look at the download section of the coppermine homepage: there are tons of user-contributed themes available for download that can be previewed on the coppermine demo page.
While you're in the process of creating a new theme, you might not want to show the theme to the visitors of your page, but you (as coppermine admin) want to be able to preview your theme. To do that, simply add theme=your_theme_name to the url in your browser.
Examples:- http://yoursite.tld/coppermine/index.php?theme=your_theme_name will show the coppermine index page, using your theme
- http://yoursite.tld/coppermine/thumbnails.php?album=1&theme=your_theme_name will show the thumbnail view of album 1, using your theme
- http://yoursite.tld/coppermine/?theme=xxx will reset your view back to the theme you chose as your default theme in coppermine config
2.5 Safe mode issues
A significant number of webhost on the Internet run PHP in safe mode. Coppermine runs without any problem in safe mode and with the "open basedir restriction" active, provided safe mode is properly configured. Unfortunately on many hosts, safe mode is not configured properly.
If your webhost is running PHP in safe mode but is misconfigured, you may need to do the following :
- With a FTP program, change the mode of Coppermine's "include" directory on your server to 0777.
- Do the same for the "albums" and "userpics" directories.
- Check that at the beginning the the "include/config.inc.php" file, you have a line with : "define('SILLY_SAFE_MODE', 1);"
2.6 Using SMTP to send emails
By default the script uses the PHP built-in mail function to send emails. In some cases, the PHP built-in function can't be used.
If in order to send emails with PHP you need to supply a hostname, a username and a password, you need to edit the file "include/mailer.inc.php" and put the correct values there ($CONFIG['smtp_host'] = 'smtp.somewhere.com'; $CONFIG['smtp_username'] = 'username'; $CONFIG['smtp_password'] = 'password';). If you don't need a username and password to connect to your SMTP server, just leave them blank.
3. Upgrading
3.1 Upgrading from version 1.0
If you already have installed version 1.0 and you want to transfer your albums to version 1.3.4 proceed in the following way:
- First, make a backup (dump) of your database.
- Install version 1.3.4 normally in a directory different from the one where you installed v 1.0. Note that in order to use the upgrade script, tables for version 1.0 and 1.3.4 must be stored in the same database.
- Copy the "albums" directory of version 1.0 into the directory where you installed version 1.3.4
- The upgrade script assumes that you used the "CPG_" prefix for tables (default value) when you installed version 1.0, if this is not the case, edit upgrade-1.0-to-1.2.php and edit the $prefix10 variable.
- Login to your 1.3.4 Gallery, enter the admin mode
- Call the upgrade script, http://yousitename/coppermine_dir/upgrade-1.0-to-1.2.php
- The upgrade from 1.0 to 1.3.4 is a two-step process. You must click the link which comes up on the bottom of the page to complete the upgrade!.
- Delete upgrade-1.0-to-1.2.php from your server.
- If you get an error, go to Coppermine 1.3.4 config page, enable debug mode, try to call the upgrade script again and check what errors you get.
This upgrade process leaves your v1.0 gallery untouched
3.2 Upgrading from releases of version 1.1
- First, make a backup (dump) of your database.
- Backup your include/config.inc.php file, your anycontent.php file and your "albums" directoy.
- Unpack the archive
- If the file install.php exists in the root directory, delete it.
- Upload all of the new files and directories
- CHMOD the albums directory and all subfolders once more to 755 or 777 (depending on your server config)
- Call the upgrade script http://yousitename/coppermine_dir/update.php
- Your upgrade should be complete.
3.4 Upgrading from cpg1.2.0rc2 or better to version cpg1.3.5
- First, make a backup (dump) of your database.
- Backup your include/config.inc.php file, your anycontent.php file and your "albums" directoy.
- Unpack the archive
- If the file install.php exists in the root directory, delete it.
- Except for the "albums" directory, upload all of the new files and directories making sure not to overwrite the include/config.inc.php file, your anycontent.php file or the albums directory.
- If you have not already done so, create a folder called "edit" within your "albums" directory - this folder will be used by coppermine as a temporary folder, do not ftp-upload files there. Make sure the new "edit"-folder is CHMODed the same way your albums-directory is (755 or 777, depending on your server's config)
- Run the file "update.php" in the coppermine directory once in your browser (e.g. http://yourdomain.tld/coppermine/update.php). This will update your coppermine install by making all necessary changes in the database.
- If you have made a custom theme, apply the changes that were introduced in the themes structure to your custom-made theme - refer to the theme-upgrade guide.
- You can not use language files from older versions of Coppermine - make sure to only have the language files that come with this package inside your lang folder (delete or rename all files from older versions within the lang folder)
Please note: as there have been changes both in the coppermine files and the database from cpg1.3.0, cpg1.3.1, cpg1.3.2 or cpg1.3.3, cpg1.3.4 to cpg1.3.5, users of cpg1.3.0/1.3.1/1.3.2/1.3.3 will have to apply all steps mentioned above: both the files have to be replaced and the update.php script has to be run once.
4. Configuration & Administration
4.1 Categories, albums and files
The Coppermine Photo Gallery (CPG) works in the following way:
- Files are stored in albums
- Albums are organised in categories
- Categories can be nested (subcategories)
If you don't have many albums, you don't need to use categories. In that case you don't create any category and all your albums will appear on the main page of the script.
There is a special category named "User galleries". This category can't be deleted. If a user belongs to a group where "can have a personal gallery" is set to YES, he will have the right to create his own albums and his gallery will be a sub-category of "User galleries".
The administrator can create albums in any category. Regular users can only create albums in "User galleries/Their_username".
4.2 Admin mode & User mode
When you are logged in as an admin, the script has two modes of operation : Admin mode & User mode. You switch between Admin & User mode by clicking on the corresponding link in the menu bar at the top of the screen.
When you are in admin mode, you can administer your gallery and the following menu bar appears :

When you are in user mode you are just a regular user and can't access the admin pages.
The items in the admin menu should be pretty self-explanatory:
- Upload approval
See all pics that await approval by the admin (depending on the settings in the "groups" control panel) - Config
Configure the overall look of your gallery and the settings using the "Config" button in the admin menu (note: you can not access the configuration by manually entering the url of the config file) - Albums
Create/edit/delete albums - Categories
Create/edit/delete categories - Users
Create/edit/delete users - Groups
Create/edit/delete groups - Ban Users
Ban users based on hostname or IP address. Make sure not to ban yourself! Use this feature with extreme care, since most users don't have static IP addresses, this feature should only be used if you really know what you're doing.


- Display Ecards
View the ecards sent by users.
- Review Comments
edit/delete user's comments - Batch add files
Batch-add files to the coppermine database that have been uploaded by FTP. - Admin Tools (Resize Pictures)
Collection of utilities to;
- Rebuild or resize intermediate pictures and thumbnails.
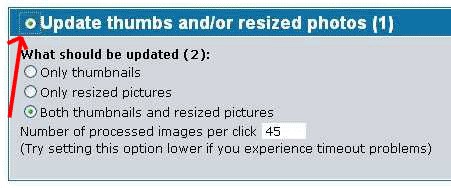
Use this if you have changed the settings for thumbnail or intermediate images in config, or if you have to replace corrupt versions.
Select the radio button for this action, then choose to rebuild the thumbnails, intermediates, or both.
This uses a lot of server resources, so if you have timeout problems, try doing it in smaller batches.- Delete full-size pictures.
Use this to save space on your webspace.
When selected, Coppermine checks to see if an intermediate copy exists, and if it does, it deletes the original sized picture, then re-names the intermediate. If no intermediate exists, Coppermine leaves the original in place.
- Delete orphaned comments.
Sometimes, when pictures have been deleted, any comments associated with them remain in the database. Use this to remove them from the database entirely.
- Rename file titles.
Use this to re-name the title of all files in an album, using info from the filename.
- Delete file titles.
Use this to clear the file titles from one or more albums.
- View your server php info.
If you are having problems, it is sometimes caused by server setup. Clicking this link will provide you with all your php and mySQL settings, as well as on the GD library (if installed). This may be needed by the support team, if you are unable to sort problems yourself.
It is not possible for visitors to your site to browse to this information, so if asked for it, copy and paste it to the support board.
- Run a database update (update.php).
After an update/upgrade, it is usually necessary to run update.php. This can be done by typing the address directly into your browser, or by clicking this link. - Rebuild or resize intermediate pictures and thumbnails.
- My profile
Edit your own user profile
There's an admin mode and user mode for "regular" users as well - the user admin has these options:
- Create / order my albums
similar to album manager in admin mode, the user can create albums within his user gallery - Modify my albums
The user can edit album title and description (similar to "album properties" for the admin, but the user can't move his albums to other categories) - My profile
The user can edit his profile (changing passwords, edit location, interests, home page and occupation properties, view quota usage). If you're using bbs integration, the "My profile" link will send the user to the bbs's profile page.
4.3 The group control panel

This is where you define what members of a group can and can't do.
The disk quota applies only for groups where "Can have a personal" gallery has been set to "YES". Both files uploaded by a user in his personal gallery as well as files uploaded to public galleries are included in the quota.
Use the anonymous group to define what non-registered users can and can't do. Quota and "Can have a personal gallery" are meaningless for anonymous users.
Bear in mind that if a user is a member of a group where "can rate pictures", "can post comments" or "can upload files" is set "YES", he will have the right to perform these operations only in albums where they are allowed, ie. uploading files will only be possible in albums where "Visitors can upload files" has been set to YES.
If "can have a personal gallery" is set to YES, the members of the group will have their own gallery in the "User galleries" category where they will be able to create their own albums.
If "priv. upl. approval" is set to NO, files uploaded by members of the group in albums created in their own gallery won't need to be approved by the admin.
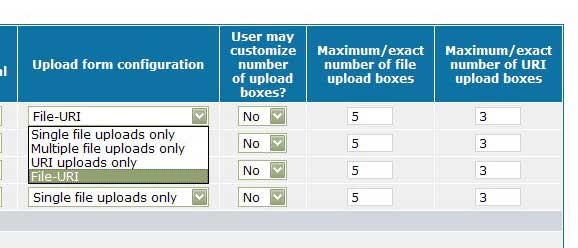
The group control panel enables you to control the upload experience of any group.
Upload form configuration lets you select the type of upload form a group may use. Four form types are currently available.
- Single file uploads only - The group may not use advanced uploading features. They may upload one file at a time.
- Multiple file uploads only - The group may upload multiple files at one time.
- URI uploads only - The group may only upload files using URIs. Acceptable URIs must begin with 'http://' or 'ftp://'.
- File-URI - The group may upload files using file upload boxes and URIs.
User may customize number of upload boxes? allows the user to select the number of upload boxes for an upload.
Maximum/exact number of file upload boxes controls the number of file upload boxes presented to the user. If the user may customize the number of boxes, this setting serves a maximum limit for the number of boxes he may request. Otherwise, this setting determines the number of boxes that will appear on the upload form.
Maximum/exact number of URI upload boxes is the same type of control as Maximum/exact number of file upload boxes, but it controls the presentation of URI upload boxes.
4.4 The categories control panel
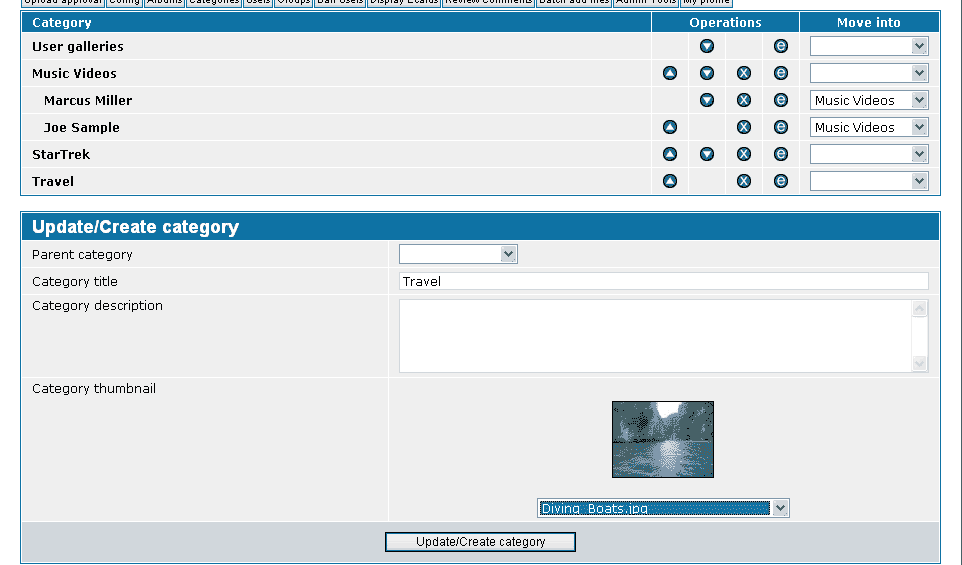
This is where you can edit your categories.
- The
 button
allows you to edit the title, description and parent category of an
existing cetegory.
button
allows you to edit the title, description and parent category of an
existing cetegory.
- The
 button
allows you to delete a category. Deleting a category does not delete the
albums and files it contains. They are simply moved to the "Root"
category.
button
allows you to delete a category. Deleting a category does not delete the
albums and files it contains. They are simply moved to the "Root"
category.
- The
 and
and  buttons allow you to
order your categories.
buttons allow you to
order your categories.
- The "Move into" dropdown lists allow you to change the parent of a specific category.
"User galleries" is a special category. It is not visible unless
you have some users that have created their own gallery. It can't be
deleted but you can edit its title and description by using the ![]() button.
button.
4.5 The Album Manager

Coppermine stores files inside of albums, so you'll need at least one album your pictures/files can go to. Albums can be stored in categories (but they don't need a category, they can as well go into the coppermine "root").
When you click on "albums" in the admin menu, you will see the Album Manager.
4.5.1 Creating albums
- Choose a category from the dropdown list "Select category" where your album should go to (or choose "* No category *" if the album should go into the coppermine "root"). If you haven't created a category yet, go to the categories control panel first, but you can later move the album as well using the album properties page.
- Click on the button "New" - your new album will appear on the list, by default labelled "New album"
- Click on the text input filed at the bottom of the screen, highlighting the default name "New album"
- Type the album name you want to assign
- (repeat steps 2 to 4 to add more than one album)
- click "Apply modifications" to submit your changes to the database (if you don't, all changes will be lost)
- Confirm the alert box with "OK" (Are you sure you want to make these modifications ?)
4.5.2 Renaming albums
- Choose a category from the dropdown list
- Click on the album you want to change
- Click on the text input filed at the bottom of the screen, highlighting the album name
- Type the album name you want to assign
- click "Apply modifications"
- Confirm the alert box with "OK" (Are you sure you want to make these modifications ?)
4.5.3 Changing the album order
- Choose a category from the dropdown list
- Click on the album you want to move up or down in the list
- Use the arrow buttons to move the album up
 or down
- click "Apply modifications"
- Confirm the alert box with "OK" (Are you sure you want to make these modifications ?)
4.5.4 Deleting albums
- Choose a category from the dropdown list
- Click on the album you want to delete
- Click the "Delete" button
- Confirm the alert box with "OK" (Are you sure you want to delete this album ? All files and comments it contains will be lost !)
- click "Apply modifications"
- Confirm the alert box with "OK" (Are you sure you want to make these modifications ?)
4.6 Modifying albums/files
When you are in admin mode there is a menu displayed next to each album
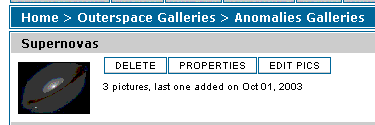
Delete allows you to delete the album and all files it contains.
Properties allows you to modify the name, description and permissions of the album
Edit pics allows you to modify the title/caption/keywords etc... of the files in the album
4.7 Uploading pics by FTP / Batch-Add Pictures
It's recommended that the coppermine admin uses ftp to upload many pics in one go. Use your ftp software to create sub-folders within your_coppermine_directory/albums/, where your ftp uploads can go to. It's a good idea to have a folder structure within the albums folder that reflects your coppermine categories and albums, but it's not mandatory.
Important: do not create folders or upload to the userpics- nor the edit-folder by ftp: these folders are used by coppermine internally and mustn't be used for any other purpose! Folder names mustn't contain dots and it's even recommended not to use any special chars - only use a-z, numbers and maybe - or _. Make sure to upload in binary or auto-mode.
Once you have uploaded your photos by ftp, click on the Batch Add Pictures button. The batch-add is done in three steps:
- find the directory under which you have uploaded your photos. Select this directory by clicking on it.
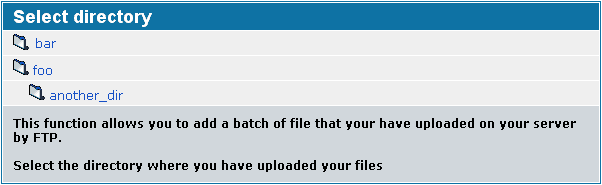
- select the photos you wish to upload (by ticking them, the new pics are pre-selected, those that already are in your coppermine database are not selected) and the album you wish to insert them into. Click "Insert Selected Pictures" to start the batch-add process.
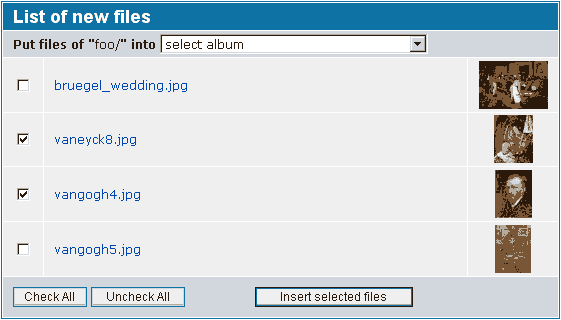
- CPG will then display the results of the batch-add (allow some time untill all results are being shown).
If the OK, DP, PB 'signs' does not appear click on the broken file to see any error message produced by PHP.
If your browser times out, hit the reload button.- OK : means that the file was succesfully added
- DP : means that the file is a duplicate and is already in the database
- PB : means that the file could not be added, check your configuration and the permission of directories where the files are located
- NA : means that you haven't selected an album the files should go to, hit 'back' and select an album. If you don't have an album create one first
Giving FTP-access to other users is a serious security threat, that's why batch-add is only available for the coppermine gallery admin.
Once files have been added to coppermine's database, make sure not to rename or delete them by ftp - use coppermine's admin menu to remove files instead, since this way they will be removed both from the file system and the database.
4.8 Album properties
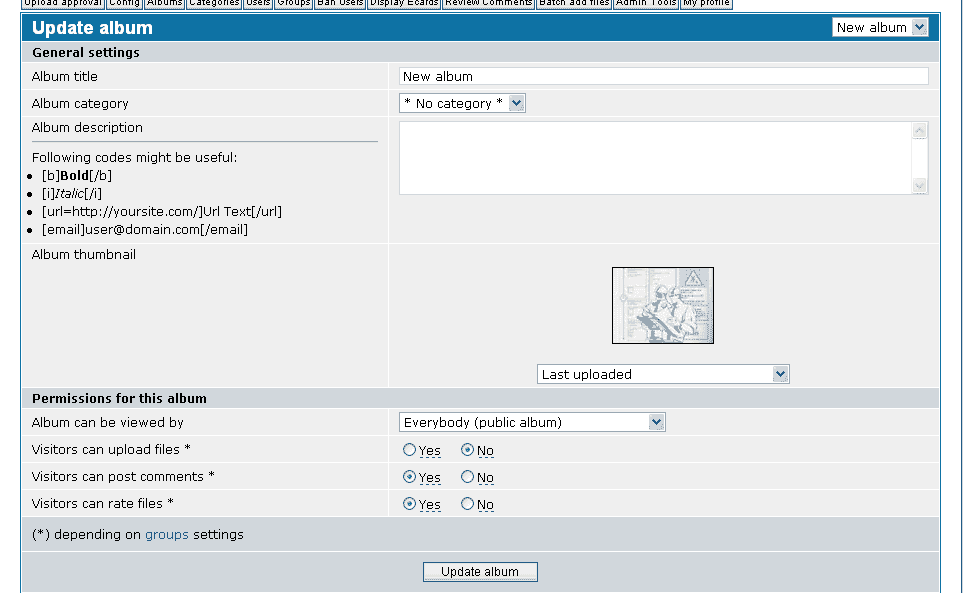
The "Album category" drop down list allows you to move an album between categories. If you set this to "* No category *" then the album will be displayed on your main page.
Coppermine understands the following bbCodes (the same bbCodes that are used by phpBB) in image and album description
- [b]bold[/b]
- [i]italic[/i]
- [url=http://url]URL text[/url]
- [email]user@domain.tld[/email]
The thumbnail is the picture that will represent the album in the album list.
If you have set "Users can can have private albums" to YES on the config page, you can define who can view the files of this album.
When "visitors can upload file" is set to YES, it is possible to upload files in this album. Note that a visitor will have the right to upload files into an album where this option is set to YES only if he is a member of a group for which "Can upload pictures" is set to YES. Non registered users are members of the "Anonymous" group.
The same rules as above apply for "Visitors can post comments" and "Visitors can rate files".
4.9 Editing files
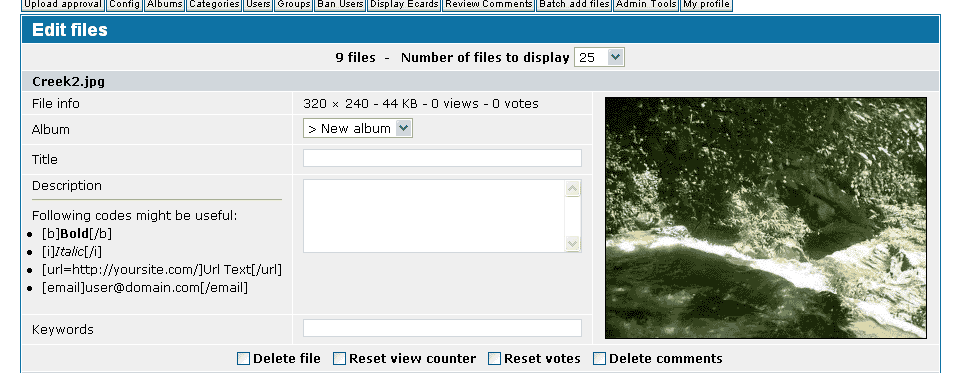
This is where you can modify the title description, keywords and custom fields (if they are used) of a file.
Use the album drop down menu to move the file to another album.
4.9.1 Editing videos
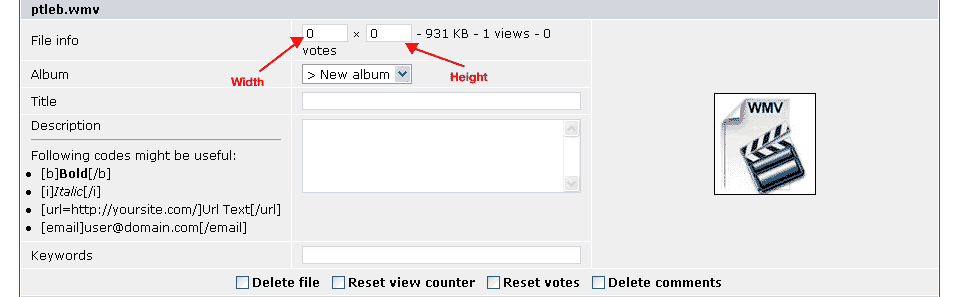
This is where you can modify the title description, keywords and custom fields (if they are used) of a video.
Use the album drop down menu to move the video to another album.
Use the height and width fields to set the size of the video.
Video uploads are available for cpg1.3.0 (or better) as part of the distribution and for cpg1.2.1 as separate modification.
![]()
![]()
![]()
![]()
![]()
![]()
![]()
![]()
![]()
![]()
![]()
![]()
![]()
![]()
![]()
![]()
![]()
4.9.2 Custom Thumbnails
Order of thumbnails:
Thumbnails are selected by level (user-defined, theme-defined, global) then by type (file-specific,
extension-specific, media-specific) in order. User-defined thumbnails are stored in the folder where the file is located. Theme-defined thumbnails
are stored in the themes 'images' folder. Global thumbnails are stored within the 'images' folder of the Coppermine root.
Thumbnails can be either a 'gif', 'png', or 'jpg'.
Types of thumbnails:
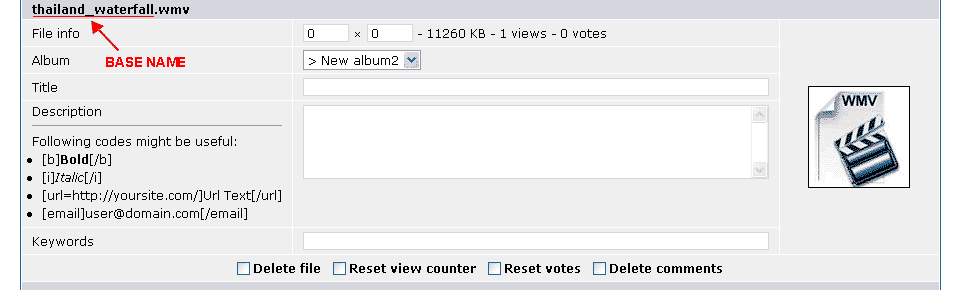
File-specific thumbnails must have the same base name as the file. Using the example in the screenshot, its thumbnails could be
'thumb_thailand_waterfall.gif', 'thumb_thailand_waterfall.png', or 'thumb_thailand_waterfall.jpg'
, chosen in that order.
Extension-specific thumbnails are named after the extension of the file. (Examples: 'thumb_wmv.jpg', 'thumb_wav.jpg'.)
The base name for media-specific thumbnails are 'thumb_movie', 'thumb_document', and 'thumb_audio'. Images use file-specific thumbnails by default.
Uploading:
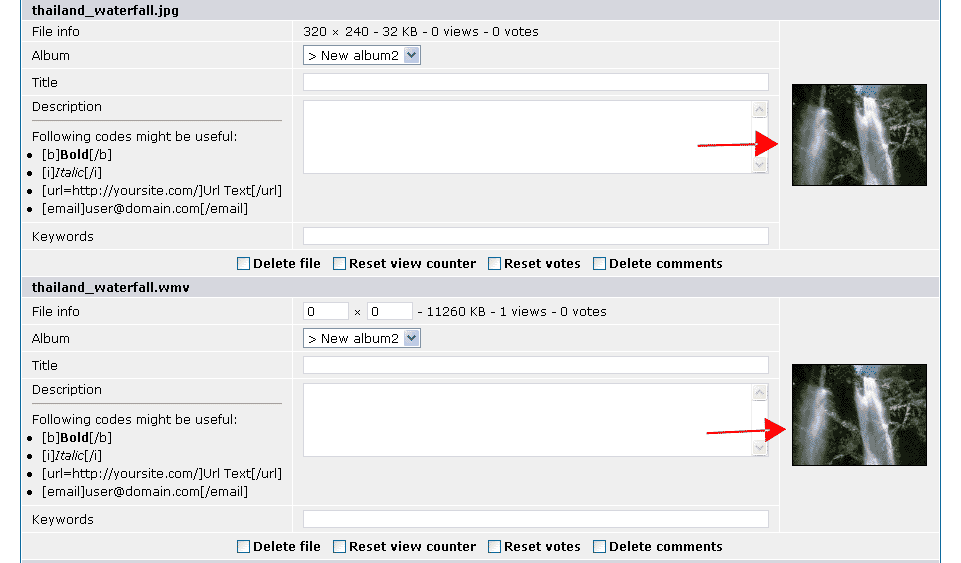
There are 2 ways to upload custom thumbnails:
1. Have an image already uploaded then upload a video via the upload page. (or vice versa) The video will share the thumbnail of the image.

2. FTP upload both the video and (thumbnail or image) then batch-add. If you FTP upload the thumbnail, the thumbnail will be shown instead of the default Coppermine thumbnail on the batch-add page. If you upload an image it will look like the screenshot. However, when the two files are added, the thumbnail of the image will be used by the video.
Final result.
Note: If methods 1 is used and the image is deleted, the thumbnail will be deleted also, and the default Coppermine thumbnails will be used.
If a previous video has be uploaded via FTP, the thumbnail must be uploaded via FTP to the same folder.
Video uploads are available for cpg1.3.0 (or better) as part of the distribution and for cpg1.2.1 as separate modification. Custom thumbnails aren't supported in versions prior to 1.3.0. Using these instructions, a custom thumbnail can be applied to any file, not just videos.
FAQS:
- QuoteI have a video named 'movie.wmv', when I upload a thumbnail for it 'thumb_movie.jpg' it replaces multiple videos!!!!Duhh. 'thumb_movie.jpg' is a media-specific thumbnail. Rename the video and the thumbnail to something other than just 'movie'.
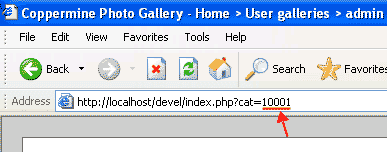
- QuoteI can't find my user's folder!From within Coppermine, browse to the user's album. Look in the url of your browser and you should see the folder's name. (See screenshot for an example.)
Your users can upload their own thumbnails by using this trick: Create an album. Change the permissions on it so no one can view it except him. Then upload the fullsize images of the thumbnails to this folder. Files outside this album will be able to use the thumbnails of these images. (See above for naming.) - QuoteHow do I stop my users from creating their own custom thumbnails?Right now, you can't.
4.10 The configuration page
4.10.1 General settings
Gallery name
This is the name of your gallery. It will appear in the title of your page and is shown on some templates.
Gallery description
This is a short description of your gallery. This description is shown on some templates below the name of your gallery.
Gallery administrator email
All emails sent by the gallery are sent with this email address.
Target address for the 'See more pictures' link in e-cards
This is the URL where a user will be directed when he will click on the
"See more pictures" link in an e-card (just the path to your coppermine folder, e.g. http://yourdomain.tld/coppermine/). Don't specify a certain file (like index.php) in this field.
This must be the URL of
your gallery, since the value entered here is used in other parts of Coppermine as well.
Gallery is offline
If you have to do maintenance work to do on your gallery, switch it to offline mode. Only members of the admin group will be able to log in, all other users will only see "Gallery is offline". Remember to switch this option off once your maintenance work is done.
![]()
![]()
![]()
![]()
![]()
![]()
![]()
![]()
![]()
![]()
![]()
![]()
![]()
![]()
![]()
![]()
![]()
Log ecards
When enabled, all ecards that are being sent are as well written into the database, where the coppermine admin can view them. Before switching this option on, make sure that logging is legal in your country. It is also advisable to notify your users that all ecards are being logged (preferrably on the registration screen).
![]()
![]()
![]()
![]()
![]()
![]()
![]()
![]()
![]()
![]()
![]()
![]()
![]()
![]()
![]()
![]()
![]()
Allow ZIP-download of favorites
When enabled, the user can download the files put into the favorites in a zip-file from the "My favorites" page. This option requires zlib to be installed on your server (run phpinfo to check if this library exists on your server).
![]()
![]()
![]()
![]()
![]()
![]()
![]()
![]()
![]()
![]()
![]()
![]()
![]()
![]()
![]()
![]()
![]()
4.10.2 Language, Themes & Charset settings
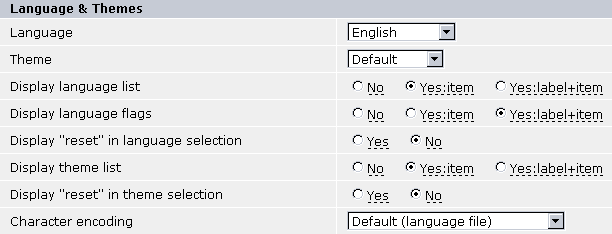
Language
This is the default language for your gallery. All language files are stored in the lang directory on your server.
The language files with an "-utf8" suffix are unicode encoded files. If you select an -utf8 file as the default language and you set "Character encoding" to "Unicode (utf-8)" then the script will auto detect the preferred language of the visitor based on what is configured in his browser. If the corresponding language is available it will be used else the default language file will be used.
When the script auto detect the preferred language, it stores the result in a cookie on the visitor's computer. To reset this cookie (and so force the script to do another auto detection) call it with something like: http://yoursite.com/coppermine_dir/index.php?lang=xxx
Once you have added some comments or files to your gallery, you should not change the character set of your gallery. If you do so, non-ASCII character may not be shown correctly.
Theme
Use this line to select the theme of your gallery. Themes are stored in sub-directories of the themes directory.
Display language list
Enable this option if you want your users to be able to select their own language with a dropdown list (you can specify to display only the list itself or a label saying "Choose your language:" in front of the list). Edit your template file (/themes/yourtheme/template.html) to specify where the language dropdown list should appear on your gallery (look for {LANGUAGE_SELECT_LIST}).
![]()
![]()
![]()
![]()
![]()
![]()
![]()
![]()
![]()
![]()
![]()
![]()
![]()
![]()
![]()
![]()
![]()
Display language flags
Enable this option if you want your users to be able to select their own language by clicking on a flag representing their language (you can specify to display only the flags themselves or a label saying "Choose your language:" in front of the flags). Edit your template file (/themes/yourtheme/template.html) to specify where the language dropdown list should appear on your gallery (look for {LANGUAGE_SELECT_FLAGS}).
![]()
![]()
![]()
![]()
![]()
![]()
![]()
![]()
![]()
![]()
![]()
![]()
![]()
![]()
![]()
![]()
![]()
Display "reset" in language selection
This option only applies if you enabled language selection at all - it will show a "default"-icon or list entry to let the users go back to the original language of your gallery.
![]()
![]()
![]()
![]()
![]()
![]()
![]()
![]()
![]()
![]()
![]()
![]()
![]()
![]()
![]()
![]()
![]()
Display theme list
Enable this option if you want your users to be able to select another theme with a dropdown list (you can specify to display only the list itself or a label saying "Choose your theme:" in front of the list). Edit your template file (/themes/yourtheme/template.html) to specify where the theme dropdown list should appear on your gallery (look for {THEME_SELECT_LIST}).
This option only makes sense if you have at least one other theme in your /themes/ folder than your default theme. It's recommended to only offer this option if there's an additional benefit for the user (for example a theme with less graphics in it that loads faster for users on a dial-up connection, or a theme with reduced color pallettes and good contrast).
![]()
![]()
![]()
![]()
![]()
![]()
![]()
![]()
![]()
![]()
![]()
![]()
![]()
![]()
![]()
![]()
![]()
Display "reset" in theme selection
This option only applies if you enabled theme selection at all - it will show a "default" list entry to let the users go back to the original theme of your gallery.
![]()
![]()
![]()
![]()
![]()
![]()
![]()
![]()
![]()
![]()
![]()
![]()
![]()
![]()
![]()
![]()
![]()
Display FAQ
This option adds "FAQ" to the menu bar when enabled. If a user clicks on it, it will display a list of "Frequently asked question" on how to use coppermine. To change the content of the FAQ, edit the file /your_coppermine_folder/lang/yourlanguage.php (e.g. english.php) and look for
// ------------------------------------------------------------------------- //
// File faq.php
// ------------------------------------------------------------------------- //
Edit the stuff that comes after it.
Display bbcode help
When enabled, this will display the bulletin board codes that are allowed to use in description fields next to the field.
![]()
![]()
![]()
![]()
![]()
![]()
![]()
![]()
![]()
![]()
![]()
![]()
![]()
![]()
![]()
![]()
![]()
Character encoding
This should normally be set to "Default (language file)" or "Unicode (utf-8)". See the discussion in the "language" section of this page.
4.10.3 Album list view
Width of the main table (pixels or %)
This is the width of tables used on your main page or when you are viewing thumbnails of an album. You can enter a width in pixels or specify it in percents. The default value is 100%.
Number of levels of categories to display
The default value is 2. With this value the script will display the current categories plus one level of sub-categories.
Number of albums to display
This is the number of albums to display on a page. If the current category contains more albums, the album list will spread over multiple pages.
Number of columns for the album list
Self explanatory. The default value is 2.
Size of thumbnails in pixels
This is the size of the thumbnails that are displayed for each album. 50 means that the thumbnail will fit inside a square of 50x50 pixels.
If the size you specify there is larger than "Pictures and thumbnails settings/Max width or height of a thumbnail", the thumbnail will be stretched.
The content of the main page
This option allows you to change the content of the main page displayed by the script.
The default value is "catlist/alblist/random,2/lastup,2"
You can use the following "codes"
- 'breadcrumb': navigation inside the gallery (e.g. "home > category > subcategory > album")
- 'catlist': category list
- 'alblist': album list
- 'random': random files (leaving random files "on" for huge galleries with more than 10,000 pics might result in performance problems; switch random "off" in this case)
- 'lastup': last uploads
- 'topn': most viewed
- 'toprated': top rated
- 'lastcom': last comments
- 'lasthits': last viewed
- 'anycontent': inserts php-generated content that has to reside within the file 'anycontent.php' into the index page. Can be used to include banner-rotation scripts or similar.
- 'lastalb': last created albums
The ,2 means 2 rows of thumbnails.
Show first level album thumbnails in categories
Use this setting to choose between showing or not showing thumbnails from the first album in the categories.
4.10.4 Thumbnail view
Number of columns on thumbnail page
Default value is 4 this means that each row will show 4 thumbnails.
Number of rows on thumbnail page
Default value is 3.
Maximum number of tabs to display
When the thumbnails spread over multiple pages, tabs are displayed at the bottom of the page. This value define how many tabs will be displayed.
Display file caption (in addition to title) below the thumbnail
Toggles whether the file caption is displayed
below each thumbnail while user is in thumbnail view.
![]()
![]()
![]()
![]()
![]()
![]()
![]()
![]()
![]()
![]()
![]()
![]()
![]()
![]()
![]()
![]()
![]()
Display number of views below the thumbnail
Toggles whether the number of views is displayed
below each thumbnail while user is in thumbnail view.
![]()
![]()
![]()
![]()
![]()
![]()
![]()
![]()
![]()
![]()
![]()
![]()
![]()
![]()
![]()
![]()
![]()
Display number of comments below the thumbnail
Toggles the display of the number of comments for below each thumbnail.
![]()
![]()
![]()
![]()
![]()
![]()
![]()
![]()
![]()
![]()
![]()
![]()
![]()
![]()
![]()
![]()
![]()
Default sort order for files
This option determines if you wish to have the file caption displayed below each thumbnail while user is in thumbnail view.
Minimum number of votes for a file to appear in the 'top-rated' list
Used to determine how many votes a file must receive before appearing as "top-rated." If a file has received less than "this value" votes, it will not be displayed on the "top-rated" page.4.10.5 Image view & Comment settings
Width of the table for picture display (pixels or %)
The width of the table used to display the intermediate picture.
File information are visible by default
Define whether or not file information (those that appear when you click on the (i) button) should be visible by default.
Filter bad words in comments
Remove "bad words" from comments. The "bad words" list is in the language file. So far only the English language file has one.
Max length for an image description
Maximum number of characters that an image description may contain.
Max number of characters in a word
This is intended to prevent that someone break the layout of the gallery by posting a long comment without space. With the default value, words with more than 38 characters are censored.
Max number of lines in a comment
Prevent a comment for containing too many new line char.
Maximum length of a comment
Maximum number of characters that a comment may contain.
Show film strip
Toggles display of a "film strip" showing thumbnails of prior
and following photos in the album.
![]()
![]()
![]()
![]()
![]()
![]()
![]()
![]()
![]()
![]()
![]()
![]()
![]()
![]()
![]()
![]()
![]()
Number of items in film strip
Set the number of thumbnails to display in film strip.
![]()
![]()
![]()
![]()
![]()
![]()
![]()
![]()
![]()
![]()
![]()
![]()
![]()
![]()
![]()
![]()
![]()
4.10.6 Picture and thumbnail settings
Quality for JPEG files
The quality used for JPEG compression when the script resizes an image. Value can range from 0 (worst) to 100 (best). This value can be set to 75 when using ImageMagick.
Max dimension of a thumbnail
Sets the maximum size in pixels for the specified dimension for thumbnails.
Use dimension ( width or height or Max aspect for thumbnail )
Sets the dimension for which the maximum pixel size should apply to.
Create intermediate pictures
By default, whenever you upload a file, the script creates a thumbnail of the file (file name with a thumb_ prefix) plus an intermediate version (file name with a normal_ prefix). If you set this option to NO, the intermediate file is not created.
Max width or height of an intermediate picture
The intermediate pictures are those that appears when you click on a thumbnail. The default value is 400, it means that the intermediate picture will fit inside a square of 400x400 pixels.
Max size for uploaded files (KB)
Any file with a file size larger than this value will be rejected by the script.
Max width or height for uploaded pictures (pixels)
Limit the dimensions of the pictures that are uploaded. Resizing large pictures requires a lot of memory and consumes CPU.
4.10.7 Files and thumbnails advanced settings
Show private album Icon to unlogged user
Toggles the display of the private album icon to unlogged users.
Set to 'NO', the album is hidden from unauthorised users.
Set to 'YES', the album name, description and statistics are shown, but not the thumbnails or files.
Characters forbidden in filenames
When the filename of a file that is uploaded contains one of these characters, it will be replaced with an underscore.
Don't change this unless you know exactly what you are doing.
Accepted file extensions for uploaded pictures
Any file uploaded whose extension is not in this list will be rejected by the script. This is intended to prevent a user from uploading non-image files.
The GD library only supports JPEG and PNG images so other types of
files will be rejected even if their extension is valid.
![]()
![]()
![]()
![]()
![]()
![]()
![]()
![]()
![]()
![]()
![]()
![]()
![]()
![]()
![]()
![]()
![]()
Allowed image types
"ALL" will result in all allowed image file types that your image library (GD or ImageMagick) is capable of handling to be allowed. If you want to restrict the allowed file types to certain types only, enter a coma-separated list of extensions, e.g. jpg,bmp,tif
![]()
![]()
![]()
![]()
![]()
![]()
![]()
![]()
![]()
![]()
![]()
![]()
![]()
![]()
![]()
![]()
![]()
Allowed movie types
"ALL" will result in all allowed movie file types to be uploaded. If you want to restrict the allowed file types to certain extensions only, enter a coma-separated list of extensions, e.g. wmv,avi,mov.
Note that being able to display a movie requires the cpg-user to have the codecs needed to display the movie installed and configured properly on their computer, e.g. if you allow the file type mov, the user who is going to watch the movie will need to have Apple's Quick-Time plug-in installed. Also note that avi is just a container for different codecs - this means that a computer which is capable of playing movie1.avi may not be capable of playing movie2.avi if those files have been encoded with different codecs.
![]()
![]()
![]()
![]()
![]()
![]()
![]()
![]()
![]()
![]()
![]()
![]()
![]()
![]()
![]()
![]()
![]()
Allowed audio types
"ALL" will result in all allowed audio file types to be uploaded. If you want to restrict the allowed file types to certain extensions only, enter a coma-separated list of extensions, e.g. wav,mp3,wma.
Note that being able to listen to an audio file requires the cpg-user to have the codecs needed installed and configured properly on their computer, e.g. if you allow the file type mp3, the user who is going to listen to the file will need to have an mp3-player installed.
![]()
![]()
![]()
![]()
![]()
![]()
![]()
![]()
![]()
![]()
![]()
![]()
![]()
![]()
![]()
![]()
![]()
Allowed document types
"ALL" will result in all allowed document file types to be uploaded. If you want to restrict the allowed file types to certain extensions only, enter a coma-separated list of extensions, e.g. txt,pdf.
Note that being able to browse a document file requires the cpg-user to have a software installed and configured properly on their computer that is capable of displaying the document type uploaded, e.g. if you allow the file type xls, the user who is going browse the file will need to have an application installed that can display MS-Excel sheets. Be carefull with some document types (especially if you allow users to be capable of uploading documents without admin approval), as they may contain macro viruses.
![]()
![]()
![]()
![]()
![]()
![]()
![]()
![]()
![]()
![]()
![]()
![]()
![]()
![]()
![]()
![]()
![]()
Method for resizing images
If you are using GD 1.x and the colors of your thumbnails or intermediate image are wrong then switch to GD 2.x
Path to ImageMagick 'convert' utility (example /usr/bin/X11/)
If you are using ImageMagick convert utility to resize you picture, you must enter the name of the directory where the convert program is located there. Don't forget the trailing "/".
If your server is running under Windows, use / and not \ to separate components of the path (eg. use C:/ImageMagick/ and not C:\ImageMagick\). This path must not contain any space so under Windows don't put ImageMagick in the "Program files" directory.
ImageMagick will hardly work if PHP on your server is running in SAFE mode and it is a real challenge to get it running under Windows. Consider using GD in these cases and don't waste your time asking for support in the forum. There are too many things that can prevent ImageMagick to work correctly and without a physical access to your server it is hard to guess what is wrong.
Allowed image types (only valid for ImageMagick)
This is the list of image types that the script will accept when using ImageMagick. Image type detection is performed by reading the header of the file and not by looking at its file extension.
Command line options for ImageMagick
Here you can add options that will be appended to the command line when executing ImageMagick. Read the ImageMagick Convert manual to see what is available.
Read EXIF data in JPEG files
With this option turned on, the script will read the EXIF data stored
by digicams in JPEG files. For cpg1.x to cpg1.2.1, this option will work only if PHP was compiled
with the EXIF extension. Coppermine 1.3.0 (or better) comes with built-in EXIF support even if the webserver itself doesn't have EXIF support, as it uses a separate EXIF class.
![]()
![]()
![]()
![]()
![]()
![]()
![]()
![]()
![]()
![]()
![]()
![]()
![]()
![]()
![]()
![]()
![]()
Read IPTC data in JPEG files
With this option turned on, the script will read the IPTC data stored
by digicams in picture files.
![]()
![]()
![]()
![]()
![]()
![]()
![]()
![]()
![]()
![]()
![]()
![]()
![]()
![]()
![]()
![]()
![]()
The album directory
This is the base directory for your "Image Store". The path is relative to the main directory of the script.
You can use ../ in the path to move-up one level in the directory tree.
You can not use an absolute path there ("/var/my_images/" will not work) and the album directory must be visible by your web server.
The directory for user files
This is the directory where files uploaded with the web interface are stored. This directory is a subdirectory of the album directory.
The same remarks as above apply.
When you upload files by FTP, store them in a subdirectory of the "album directory" and not inside the "directory for user files".
The prefix for intermediate pictures
This prefix is added to the file name of created pictures.
The prefix for thumbnails
This prefix is added to the file name of created intermediate thumbnails.
Default mode for directories
If during the installation, the installer complained about directory not having the right permissions set this to 0777 else you won't be able to delete the directories created by the script with your FTP client the day you will decide to uninstall the script.
Default mode for files
If during the installation, the installer complained about directories not having the right permissions set this to 0666.
4.10.8 User settings
Allow new user registrations
Define whether new users can self-register or not.
User registration requires email verification
If set to YES an email will be sent to the user that will contain a code to activate his account. If set to NO, user accounts become immediately active.
Notify admin of user registration by email
If set to YES an email will be sent to the gallery admin when a new user registers.
![]()
![]()
![]()
![]()
![]()
![]()
![]()
![]()
![]()
![]()
![]()
![]()
![]()
![]()
![]()
![]()
![]()
Allow two users to have the same email address
Allow or prevent two users from registering with the same email address. Recommended setting is NO
Users can can have private albums
If set to YES then your gallery can contain albums that can be visible only by users that belong to a certain group.
If a user is a member of a group that can have its own gallery and this option is turned on then this user will have the permission to hide some of their albums to other users.
Note: if you switch from 'yes' to 'no' any current private albums will become public!
Notify admin of user upload awaiting approval
When enabled, the gallery admin receives an email notification of all pics that wait for his approval (depends on the approval settings in "groups"). The email is sent to the address specified in "General settings".
This option is only recommended with low or medium traffic (if users only upload every now and then).
![]()
![]()
![]()
![]()
![]()
![]()
![]()
![]()
![]()
![]()
![]()
![]()
![]()
![]()
![]()
![]()
![]()
Allow logged in users to view memberlist
When enabled, an additional menu item "Memberlist" is being displayed in the coppermine main menu if a user is logged in, to let him see a list of all users, with stats on their last visits, uploads and quota usage.
This is a new feature in cpg1.3.0 (user contribution by Jason) - it's available as mod (not in the regular coppermine package) for older versions than cpg1.3.0.
![]()
![]()
![]()
![]()
![]()
![]()
![]()
![]()
![]()
![]()
![]()
![]()
![]()
![]()
![]()
![]()
![]()
4.10.9 Custom fields for image description (leave blank if unused)
These fields are displayed within the "file information" area. They will appear only if you give them a name.
4.10.10 Cookie settings
Name of the cookie used by the script
Default value is "cpg130". Even if you have multiple instances of the
script running on the same server you can keep the default value.
When using bbs integration, make sure it differs from the bbs's cookie name
Path of the cookie used by the script
Default value is "/". Don't change this unless you know what you are doing. This may prevent you from logging in.
If you have broken your gallery by modifying this value, use phpMyAdmin to edit the xxxx_config table in your database and restore the default value.
When using bbs integration into Coppermine, make sure to use different cookie names for coppermine and your bbs!
4.10.11 Miscellaneous settings
Enable debug mode
CPG will show error messages which are normally suppressed. This is
helpful in troubleshooting problems with your gallery or when asking
for help on the
CPG Support Forums. Turn this feature off if you don't experience problems.
Turn it on (option "Everyone") if you are requesting help on the coppermine support board, so the supporters can have a look at the debug output as well. Choose the option "Admin only" when trouble-shooting on your own - debug output will be only visible when you're logged in as admin, regular users or guests won't see the debug output.
Display notices in debug mode
May be helpfull to trouble-shoot problems with your coppermine install - only recommended if you know a little PHP and you can understand the additional error messages this option shows. This option only applies if debug mode is enabled.
5. Integrating the script with your bulletin board
5.1 Available bridge files
Coppermine can be integrated with the following bulletin boards (eg. Coppermine and your bulletin board will share the same user database).
- phpBB 2
- Invision Power Board
- vBulletin
- YaBB SE
- Woltlab Burning Board 2.1
- SMF
- PunBB 1.1.5
5.2 Pre-requistes
5.2.1 Authentification by cookie
The login integration uses your bulletin board cookies, therefore it won't work if your board cookies are not visible by Coppermine. So unless you are an expert, keep things simple and install Coppermine and your bulletin board on the same domain. Examples :
| This will work: | This won't work: |
| Bulletin board: http://yourdomain.com/board/ Coppermine: http://yourdomain.com/gallery/ |
Bulletin board: http://board.yourdomain.com/ Coppermine: http://gallery.yourdomain.com/ |
Important: the cookie names of your bbs and coppermine must not be the same - they must differ!
5.2.2 Standalone version first
To avoid confusion, make sure to set up both coppermine and your bbs as standalone first. Make sure they both run correctly without integration. Test all features of coppermine (like upload, registration etc.) when Coppermine is installed, before you even start integration.
5.2.3 Coppermine users, groups and pics uploaded by users are lost when integrating
Warning: If you already have users and custom groups in your coppermine database when you enable bbs integration, be aware that they will be lost. If your coppermine users have already created private albums and uploaded pics to them, they will be lost as well!
5.2.4 Backup
Backup: it is very advisable to backup both your coppermine database before enabling bbs integration, so you can savely go back if the integration fails.
In fact you're encouraged to backup your database on a regular base, and especially before applying code changes.
5.2.5 Keep Coppermine and bbs tables in the same database
It is recommended that you use the same database for your board and Coppermine (in fact it is even mandatory!).
5.3 Integration steps
5.3.1 Check your bbs settings
You will also need to perform the following operations after having unpacked the archive on your harddrive and before uploading the files to your webserver:
- If you are using phpBB 2, go to the admin control panel and check that "Cookie domain" corresponds to your domain, "Cookie name" is "phpbb2mysql" and "Cookie path" is "/".
- If you are using Invision Power Board, go to the "admin control panel / board settings / cookies" and check that all fields are blank. If they are not, you modified the default values and you are an expert.
- If you are using vBulletin, go to the "admin control panel / vBulletin options / HTTP Headers and output" and check that the value for "Cookie Domain" corresponds to your domain and that "Path to save cookies" is "/"
5.3.2 Edit your bridge file
Go to the bridge directory and open the file that corresponds to the bulletin board you use (eg. phpbb.inc.php if you use phpBB) with a text editor.
At the beginning of the file there are a number a configuration values that need to be set. For phpBB as an example they are the following :
// database configuration
define('PHPBB_DB_NAME','phpBB');     // The name of the database used by the board
define('PHPBB_BD_HOST','localhost'); // The name of the database server
define('PHPBB_DB_USERNAME','root');  // The username to use to connect to the    database
define('PHPBB_DB_PASSWORD','');      // The password to use to connect to the database

// The web path to your phpBB directory
// If your URL to your board is for example 'http://yoursite_name.com/phpBB2/',
// you'll have to set the below var to '/phpBB2/'.
define('PHPBB_WEB_PATH', '/phpBB2/');
// Logout Flag
// the value of this boolean constant depends on your phpBB version:
// If your version of phpBB is 2.0.4 or lower - change the value to FALSE;
// if your version of phpBB is 2.0.5 or newer - leave it as TRUE
define('PHPBB_LOGOUT_GET', TRUE);
Modify them according to the configuration of your board and save the file.
5.3.3 Enable bbs integration
Edit the file include/init.inc.php. At the beginning of the file you will find the following lines :
// User database integration
// Uncomment the applicable line if you want to use it
// define('UDB_INTEGRATION', 'phpbb');
// define('UDB_INTEGRATION', 'invisionboard');
// define('UDB_INTEGRATION', 'vbulletin23');
// define('UDB_INTEGRATION', 'vbulletin30');
// define('UDB_INTEGRATION', 'yabbse');
// define('UDB_INTEGRATION', 'smf');
// define('UDB_INTEGRATION', 'woltlab21');
// define('UDB_INTEGRATION', 'punbb');
Un-comment the line that corresponds to the bulletin board you use (eg. remove the "//" that are at the beginning of the line)
define('UDB_INTEGRATION', 'phpbb');
5.3.4 Special steps depending on the bbs you use
Important: if you use phpBB or PunBB, you'll have to do this additional steps
5.3.4.1 For phpBB only
Create a new file named cpg_redir.php in your phpBB directory, and paste the following code into the file:
<?php
if (!$_SERVER['HTTP_HOST']) {
  $cpg_host=$HTTP_SERVER_VARS['HTTP_HOST'];
} else {
  $cpg_host=$_SERVER['HTTP_HOST'];
}
$cpg_path='/gallery';
header("Location: http://".$cpg_host.$cpg_path);
exit;
?>
Important - before you save the file, you must ensure that:
- $cpg_path - contains the the path in which Coppermine is installed
- $cpg_host - contains the domain pointer to Coppermine. If Coppermine and phpBB are installed on the same server and domain (the "normal" case), you should leave the default value. Otherwise you should provide a string constant which contains the domain where Coppermine is installed (for example: 'www.my-other-domain.com').
- If you change both variables make sure that either $cpg_host contains a trailing slash or $cpg_path contains a leading slash. In other words, the concatenation of the two variables must result in a correct path such as www.my-other-domain.com/my_gallery_dir
5.3.4.2 For PunBB only
Create a new file named redir.php in your PunBB directory, and paste the following code into the file:
<?php

/// Set URL of coppermine to return to after login
$cpg_url = 'http://www.yousite.com/coppermine';

if (isset($_POST['redir'])){
        echo '<html>
                  <body onload="document.redir.submit();">
                      <form name="redir" method="post" action="'.$_POST['redir'].'">
                      </form>
                  </body>
              </html>';
} else {
        header("Location: $cpg_url");
}
?>
Important - before you save the file, you must ensure that:
- $cpg_url - contains the the path in which Coppermine is installed
5.3.5 Upload the modified files
Upload all modified files (the file in the "bridge" folder that corresponds to your bbs and the file include/init.inc.php, plus the redirector files your created in step "Special steps for depending on the bbs you use" if you're using one of the mentioned bbs) onto your webserver. Visit your coppermine gallery in your browser. To login as an admin, you will need to use the admin username and password of your board.
5.3.6 Synchronsising the bbs groups with Coppermine's groups
Login using the admin account of your board. Go to the gallery, enter admin mode and click on the "Groups" button. This will synchronize Coppermine groups with those of your board. The permission you will see for each group will be completely messy, so take some time to set them properly.
Each time you add or delete a group in your board you will need to do the operation above in order to keep the synchronisation of the groups.
When you will try to login / logout or manage users from Coppermine, you will be redirected to the corresponding page of your bulletin board. Once the login or logout is performed you won't be redirected automatically to the gallery because your board does not have any function for that. It's up to you to add a link on your board to get you back to the gallery.
6. Translating Coppermine into other languages
Coppermine has a separate language file that make the translation of the script much more easy. The language files are stored in the lang directory. The files with the utf-8 suffix are unicode encoded files. They are automatically generated with the iconv program so there is no need for you to make an unicode version of your translation.
If you select an utf-8 language file as the default one, then the script will be able to automatically select a language file based on the visitor browser configuration. For instance if the default language file is danish-utf-8 and an english visitor access your gallery, the english-utf-8 language file will be used by the script.
If you have translated Coppermine into a language not already supported, please read the translator's guide and visit the Coppermine Web Site at Sourceforge and follow the instructions for submitting your language.
7. Known Issues
The following slight quirks and tiny issues are known and will be fixed in future releases.
- Some small text items are only available in English, e.g picEditor. (Language issue)
- Various error messages (especially notices) while in debug mode with notices display turned on. (Does not affect main CPG app)
- Documentation (this document) and FAQ still incomplete.
- User upload settings breaks table-width display in groups manager. This feature has been added recently before the release of cpg1.3.0; the broken layout will be fixed in the next version.
- "Download favorites as zip" only works if the zlib library is installed on the server
- The arrows used for navigation from one pic to the other display in the wrong order for rtl-languages
- There is a bar that appears underneath the menus and above the album title on the category and thumbnail page that shouldn't be there in the theme "Mac OX X"
- On pages with high traffic load the "top rated" pic might get outdated while the user watches the page, resulting in the thumbnail linking to a different pic.
- minor issue with the filmstrip not displaying correctly when the number of pics to appear on the filmstrip is set to an even number
- Crop and rotate not working on all server setups.
- ISO settings missing from exif data in most languages.
8. Credits
8.1 Coppermine team
| Developer | Username | Role/Position | Status |
| Aditya Mooley | Aditya | Developer | active |
| Clive Leech | casper | Supporter | active |
| Maarten Hagoort | DJ Maze | Developer (nuke team) | active |
| Eyal Zvi | EZ | Developer | active |
| Joachim Müller | gaugau | Project Manager | active |
| Scott Gahres | gtroll | Developer (nuke team project manager) | active |
| Jack | datajack | Developer | active |
| Dave Kazebeer | kegobeer | Support Technician | active |
| Tommy | Nibbler | Supporter | active |
| Jay Hao-En Liu | Oasis | Developer | retired |
| Christopher Brown-Floyd | omniscientdeveloper | Developer | retired |
| Timothy | skybax | Developer | retired |
| Dr Tarique Sani | tarique | Lead Developer | active |
| DJ Axion | djaxion | Developer | retired |
| Grégory Demar | Greg | Developer, Original creator of Coppermine | retired |
| Hyperion | hyperion01 | Developer | retired |
| John Asendorf | jasendorf | Developer | retired |
| mitirapa | mitirapa | Porter (Cross Platform Devel.) | retired |
| Moorey | moorey | Web Designer | retired |
| David Holm | wormie_dk | Developer | retired |
| Mark Zerr | zarsky99 | Tester | retired |
8.2 Contributors
| DaMysterious | DaMysterious has created loads of fantastic themes for Coppermine |
| Nanobot | Doug has done the vBulletin v3 bridge file |
| Girish Nair | Girish has contributed to the film strip feature |
| Jason Kawaja | Jason did the memberlist hack |
8.3 Coppermine uses code from the following free softwares :
phpBB
Author: phpBBGroup
URL: http://www.phpbb.com/
phpMyAdmin
Author: phpMyAdmin devel team
URL: http://www.phpmyadmin.net/
phpPhotoAlbum
Author: Henning Støverud
E-mail: henning AT stoverud DOT com
URL: http://www.stoverud.com/PHPhotoalbum/
DOM Tooltip 0.6.0
Author: Dan Allen
E-mail: dan AT mojavelinux DOT com
URL: http://www.mojavelinux.com/forum/viewtopic.php?t=127
Note: DOM Tooltip, which is being used with the theme "styleguide" only, is released under LGPL
TAR/GZIP/ZIP Archive Classes
Author: Devin Doucette
E-mail: darksnoopy AT shaw DOT ca
phpExifRW
Author: Vinay Yadav (vinayRas)
E-mail: vinay AT sanisoft DOT com
URL: http://www.sanisoft.com/phpexifrw
Note: phpExifRW is a pure PHP class to read, write and transfer EXIF information that most of the digital camera produces. It is released under LGPL
Codelifter Slideshow
URL: http://www.codelifter.com
8.4 Copyright and disclaimer
This application is opensource software released under the GPL.
Because the program is licensed free of charge, there is no warranty for the program, to the extent permitted by applicable law. Except when otherwise stated in writing the copyright holders and/or other parties provide the program "as is" without warranty of any kind, either expressed or implied, including, but not limited to, the implied warranties of merchantability and fitness for a particular purpose. The entire risk as to the quality and performance of the program is with you. Should the program prove defective, you assume the cost of all necessary servicing, repair or correction.
Coppermine Photo Gallery is Copyright © 2002 - 2005 Grégory
DEMAR and the Coppermine Dev Team, All Rights Reserved.